
- > ESO Update 50 PvP Guide: Maximize Gains in the Permanent Vengeance Campaign & Veterancy System
- > PoE 2 Ancient Beacons Quest Guide: How to Unlock and Farm Atziri's Temple in Patch 0.5
- > Where to Find the Survivor Augment Blueprint in ARC Raiders (2026 Complete Guide)
- > How to Anoint an Amulet in PoE 2 Patch 0.5: Complete Liquid Emotions Guide
- > Diablo 4 March of the Goblins Guide 2026: Best Farming Routes, All Goblin Types & Rewards
- > Path of Exile 2 The Runeseeker Guide: All Runestone Locations, Farrow, Runeforging & Verisium Explained
POE 2 New Delirium Mechanics, Liquid Emotions & Jewel Crafting

The Patch 0.5.0 "Return of the Ancients" update has completely transformed the Delirium endgame experience. Gone is the old “walk into fog and run” system. Delirium now revolves around a progression loop with its own storyline and hub called The Withered Willow, offering high-reward gameplay for seasoned mappers.
Delirium now measures rewards based on a Fog Depth Bar, drops Liquid Emotions for direct Jewel modifications, and leads to the Grand Mirror Atlas system. Players can now optimize jewels and amulets while exploring new endgame content and facing Tangmazu, the ultimate Trickster God.
💡 Struggling with the brutal new 100% delirious map bosses? Don't brick your expensive waystones. Check out SSEGold's specialized Path of Exile 2 Boss Carry Services to secure your high-tier drops effortlessly.
Navigating the New Fog Mechanics: Depth Bars & Shards
The Depth Tracker
Instead of old arbitrary numeric layers, a Depth Tracker Bar now appears at the bottom of your screen. It measures how deep inside the Delirium fog you are, with rewards scaling dynamically based on distance and time spent in the mist.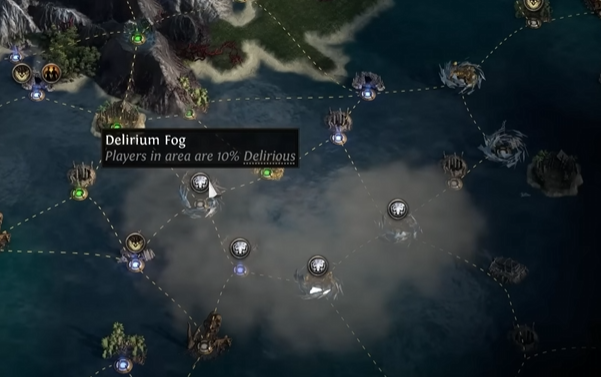
Directional Fog
The fog now has a physical directional animation, guiding players visually toward map bosses. This feature makes exploration less guesswork-heavy and more intuitive for strategic mapping.
Purple vs. Red Mirror Shards
- Purple Shards: Shattering these transforms normal enemies into nightmarish, high-yield variants, ideal for farming top-tier loot.
- Red Shards: Drag the player into mental trials of enemy waves, necessary to acquire specialized endgame rewards and Delirium progression items.
How to Craft with Liquid Emotions (Jewels & Amulets)
The Jewel Crafting Process
Using Liquid Emotions (also called Distilled Emotions) on a Jewel allows players to remove a random modifier and explicitly replace it with a Delirium stat, such as critical strike chance or movement speed. This deterministic crafting loop is ideal for high-level build optimization.
Amulet Notable Instilling
Liquid Emotions can also instill passive skill tree Notables onto amulets, enabling dual-notable setups that were previously impossible.
You may also want to know more about How to Anoint an Amulet in PoE 2 Patch 0.5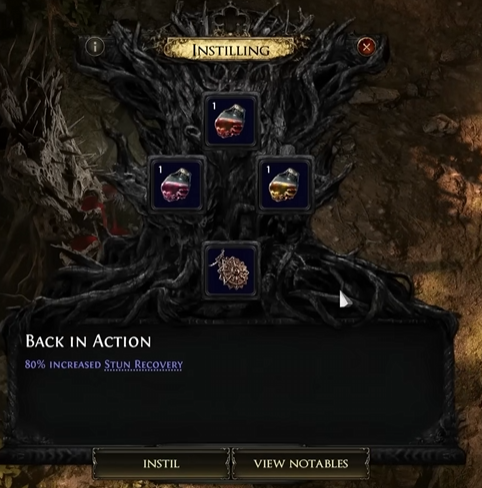
The 0.5.0 Base Types
New sub-area Loathsome Mire maps drop amulet bases capable of holding two concurrent Notables at the cost of an affix suffix/prefix, making farming these maps essential for late-game progression.
The Reforging Bench
Players can use a 3:1 vendor recipe loop: combining three matching tiers of a Liquid Emotion (e.g., Liquid Ire) upgrades it into the next tier (e.g., Liquid Guilt). This system adds a progression loop for crafting higher-tier modifiers efficiently.
The Grand Mirror Atlas Guide: Reaching Tangmazu
Spawning the Grand Mirror
Completing standard map mirrors gives a random chance to spawn a physical Grand Mirror on a neighboring Atlas map. This is your gateway to unlocking the endgame content around Tangmazu.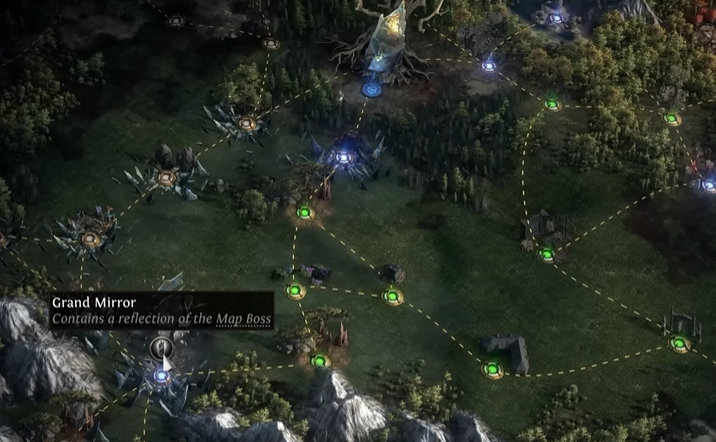
The Trial of Madness & Insanity Fruit
Defeating double-empowered map bosses drops a specialized Insanity Fruit. Consuming it spreads permanent Delirium fog over your Atlas, unlocking new areas while challenging your mapping efficiency.
The Pinnacle Simulacrum Loop
Increasing your Delirium percentage grants access to the final, hardest encounter with the Trickster God, Tangmazu. Mastery here requires scaling fog exposure and farming specialized Simulacrum splinters.
Table of contents
Buy Path of Exile 2 Products
Recommended Article
